Sunday, May 3, 2015

Technique for Almost Painless Palatal Anesthesia

As stated previously, some clinicians (Sebastian Baumgaertel) claim that a palatal miniscrew can be inserted with a strong topical anesthetic only.  While I think that is probably true, the one time I tried it I could tell that the patient felt something.  Obviously, I don't want that to happen on a regular basis so I combine a strong topical with local anesthetic using an ultra small needle.

In the next blog post, I will talk about the verbal skills needed to compliment this technique.

Depending on your state law, the initial part of this technique can be delegated.  Either in my treatment plan or my "Next Time Notes," I will make an entry like "Two palatal TADs, 3rd rugae."  This let's my orthodontic technician know where to place the topical.  We also review all TAD insertions at morning huddle.

So after the technician seats the patient and obtains a blood pressure and pulse reading, they then evaluate the situation and confirm that the "Next Time" notes are correct and we will be placing a TAD or two today.  The technician explains the procedure to the patient and tries to assess the patient's anxiety level.

The technician dries the palatal mucosa with gauze and uses a Q-tip to place the Profound* gel over the area of the 3rd rugae.  It is covered with several layers of gauze which the patient is instructed to hold in place for 5 minutes.  It is then rinsed off and the technician will signal me that we are good to go to do the local anesthesia.  Typically, the time between initial application of the Profound gel and the actual insertion of local is 8 minutes so usually the tissue is pretty numb at that point.

I'll then explain again to the patient what to expect (more next time) and mark the tissue area with an intra-oral marker.

I will then insert the needle into that area.  I usually bend the needle 45 degrees if I the insertion site is left of the midline and 90 degrees if right of the midline.  The tissue is thin in this area so go slow to avoid impinging on the periosteum and causing pain.

I keep injecting very slowly until I've accomplished three clicks of the syringe.  That is a total amount of anesthesia of 0.18 ml or 10% of a 1.8 ml carpule.  You will notice a blanching of the tissues.  I'll then immediately check the level of anesthesia with a perio probe by making a hole in the tissue in each area.  I'll explain to the patient that what they just felt was me making two holes (one of each side) in their gums.  They are always amazed that they felt nothing.  You always can start inserting the screw immediately after finishing injecting.

I use a Rocky Mountain Orthonia electric torque driver to insert the TAD.  It is set at 30 RPM and 30 NCm of torque.  To the best of my knowledge, it will accept the contra angle driver from all TAD manufacturers.

I'll place it in the proper area and make sure the angle of the driver is correct and then place my finger on top of the head of the driver to create some downward pressure to help the screw penetrate the bone initially.  Then I'll remove my finger after the screw is about 50% in.  Repeat on the other side if appropriate.


Most TAD systems have impression caps that are placed over the TADs at this point prior to taking an impression (see below).


To capture the most precise impression possible, I combine alginate with impression compound (brown).  The impression compound gives a very rigid impression to help stabilize the impression caps without any float.


 You soften the end of a stick of brown impression compound until it slumps and then immerse in water.  Mold it with your gloved fingers into a thick wafer, reflame it to soften the tissue surface and blow some water on it to cool it.  Then place it in the mouth adapting it to the screws.  Spray it with air to harden it.  Take a routine alginate impression.  When you remove the impression tray, the compound and the impression caps will usually come out with the alginate.

Take it to the lab and insert analogs into the caps.  Pour in yellow stone.

If there is any doubt about the stability of the compound or the impression caps, I will stabilize them with cyanoacrylate.

Addendum:  Three days after I posted this, I did two palatal screws on a dental assistant from my dentist's office.  She was pretty anxious about the idea of palatal anesthesia.  After I was done, she stated that it was really nothing to it at all.  Certainly, no more uncomfortable than buccal infiltration.  She was really amazed.


*
http://www.woodlandhillspharmacy.com/profound_gel.html

Thursday, February 5, 2015

Palatal Anesthesia Is Not The Big Bad Wolf of TAD Placement!!!


I bet you that many orthodontic residents decided to pursue the specialty of orthodontics because they had hoped to avoid all those nasty dental things like local anesthesia.  Unfortunately for them, since the advent of TADs, local anesthesia is a necessary skill in the orthodontic armamentarium.  And now, to make matters worse, we have all the miniscrew gurus saying that the best location in which to place a TAD is to insert it into the anterior palate where the bone density is ideal for TAD retention.  Oh no!  Not only is this local anesthesia but it is in an area where most dentists fear to tread.  Kind of like a double whammy.

I was lucky when I went through the orthodontic program at Tufts.  I had the chance of working as a general dentist Tuesday and Thursday evenings and all day Saturdays.  This was in a private fee for service practice where virtually every patient was an adult already treatment planned for restorative and they all were treated with local anesthesia.  I became very comfortable with the concept so it was easy to transfer those skills to the use of miniscrews.

I think the first key to doing palatal anesthesia in a patient friendly manner is to use the smallest needle available which is not a 30 gauge as most think but a 33 gauge ultra short.  A 33 gauge needle is approximately 30% smaller in diameter than a 30 gauge.  That is a big difference.

The second key is to use a strong topical anesthetic.  Some people claim that a strong topical is enough to allow you to insert a miniscrew without even local anesthetic.  I am unwilling to be that brave, nonetheless, I figure, if that is true, I can use that kind of strong topical to prior to local anesthetic.


The third key is to realize that because of the extremely small diameter of the 33 gauge needle, there will be a fair amount of back pressure so instead of using a standard syringe, you will need to use a intraligamentary syringe.  These typically have a lever arm and not a plunger.  Also,  the syringe looks more like a pen and I think that helps relax the patient.
I like the one from Septodont called a Paroject syringe.  It has a lever arm to dispense the solution.  It takes 30 activations of the lever arm to empty a 1.8 ml syringe and only 2 or 3 activations for adequate anesthesia to insert a palatal miniscrew.

Next time: Technique

Thursday, December 4, 2014

One Easy Way to Reduce Treatment Time and Broken Braces


In a previous posting, I talked about controlling vertical growth problems by placing composite resin or glass ionomer cement on the occlusal surface of terminal molars.  You can also place composite on the lingual of upper anterior teeth.  How do you decide which to do? If you want to intrude molars (think open bite), use posterior turbos.  If you want to extrude molars (think deep bite) use anterior turbos.


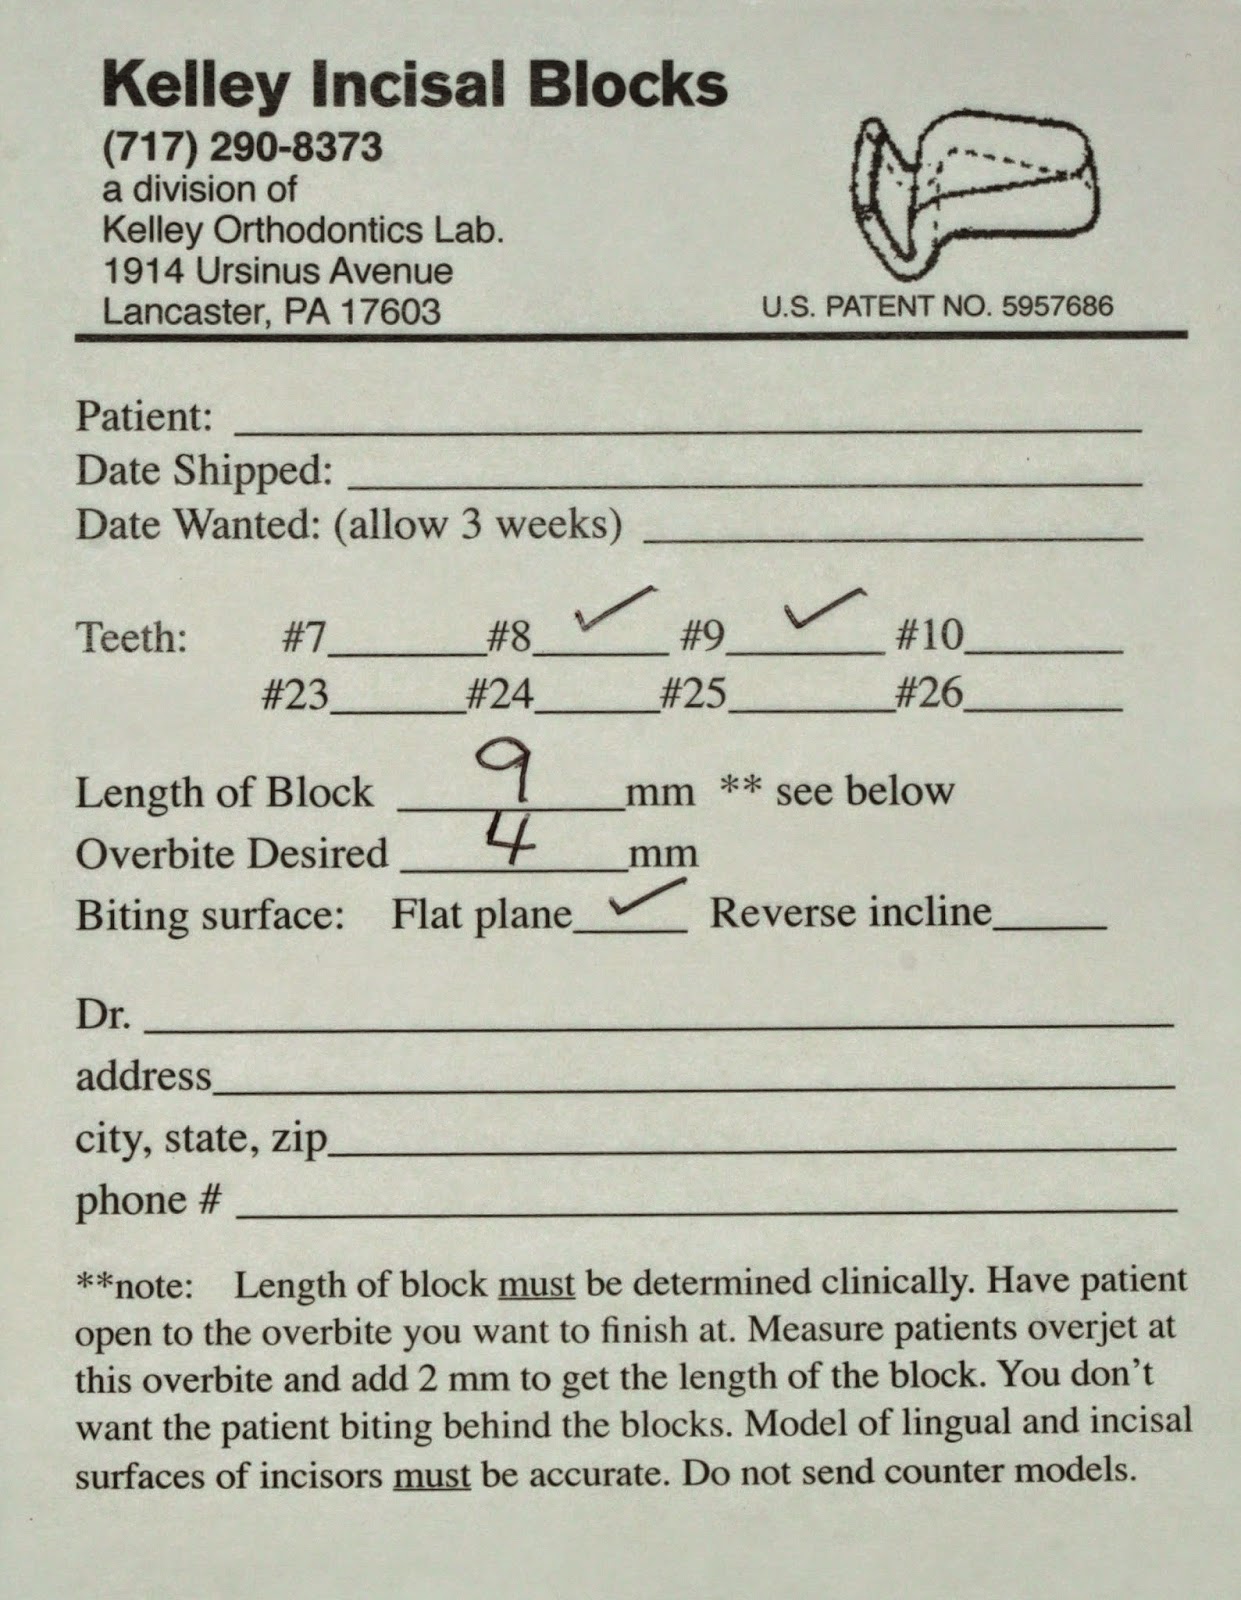
The best way to do anterior turbos to extrude molars is with custom turbos from Kelley Incisal Blocks Laboratory.  You merely obtain an anterior alginate impression and, on the lab sheet, you specify how much overbite you want to finish with.  I usually ask for 4 mm.  You also have to specify the length of the block.  This means how much overjet there is between the incisors when there is 4 mm of overbite.  This must be determined clinically but I usually just ask for 9 mm and cut away what I don’t need.  Almost always they are placed on the central incisors but can be placed on the lateral incisors if appropriate.


To bond these into place, you merely micro etch or pumice the lingual of the upper central incisors and then either traditional etch for 30 seconds or use a L-pop for 5 seconds.  Place  a generous amount of flowable composite on the custom turbo surface that faces the tooth.  No bonding resin required.*  Then place the custom turbo on the tooth.  The cap insures that it is at the proper height.  Do not etch the incisal 1 mm of the tooth so that the cap will be easy to remove.

*No sealant makes it easier to remove the cap at the end of this phase of treatment.  If you are dealing with a deep bite particularly in a teenage male carnivore, use Assure or something similar to enhance bond strength.


Light cure for 30 seconds.  Then use a #8 round bur in a slow speed to remove the cap and to smooth out the lingual anatomy as necessary.  You can advise light chewing for the next 24 hours but these things are pretty rugged and they rarely come off.  Depending on your state laws, all of the above can be delegated.  Finally, mark with blue paper and decide whether you need to full 9 mm or you can remove the excess with a straight diamond in a high speed.


In the photo below right, you can see I cut back on the length of the block.  I usually leave the turbos in until I am in a full size lower working wire.  For me that is a 19x25 in a 22 slot.  So that usually means 6 months.  You only have to grab the sides of the turbo with a How plier and squeeze once or twice to remove it.  Typically this fractures the cement and the turbo comes off.

Some people like to put these on during space closure if extractions were done or even in a deep bite non extraction case.  By opening the bite, you facilitate tooth movement.
                                                                           
Please make any comments or ask any questions below.


Thursday, November 13, 2014

Modifying a Nance Button To Use As a Bite Plane


While I use turbos of all sizes and locations, sometimes using a bite plate is the way to go.  Unfortunately, patients don’t seem to like removable bite plates as much as orthodontists like them.  So following the lead of my restorative colleagues (“I do fixed everything if possible, nothing removable”), I started doing fixed bite plates quite some time ago.

You start with a Nance button (see my post of October 11, 2014) and then extend the acrylic up on the lingual of the central and lateral incisors. (see the first image)

After curing the acrylic and removing the Nance from the model, you will notice that the underside of the acrylic that touches the central and lateral incisors has the images of those teeth.  You need to polish the images of those teeth away.  (see the 2nd and 3rd images)  If the acrylic does not actually touch the lingual of the upper incisors, you have nothing to worry about as far as decals go.  Please note that I did not trim the acrylic on the lingual of the laterals since I had planned to grind away that entire area.

Please make any comments or ask any questions below.

In my next post, I will discuss several different approaches to posterior and anterior turbos.


Sunday, November 2, 2014

Improving Nance Button Use


Now that many of us have migrated our anchorage needs to miniscrews, there is less call for Nance buttons as anchorage enhancers.  They still have a use though.  Here are some ideas on optimizing the use of Nance buttons as well as reducing patient problems:

1. Keep the acrylic portion as large as possible.  Think half dollar not nickel sized acrylic.  The use of larger acrylic buttons reduces the pressure in any particular area.
2. Don’t impinge on the incisal papilla.
3. Ask your lab to use Triad gel for the acrylic portion and not to treat the tissue side of the acrylic with any type of oxygen barrier to eliminate the oxygen inhibition layer.
4. When delivering the appliance, place a thin layer of Triad gel on the entire tissue surface and seat the appliance to the same degree you would if cementing it.  This can be delegated.
5. Light cure the Triad gel in the mouth for 15 seconds.  It gets very warm so don’t overdue the curing time.  This can be delegated.
6. Continue to light cure out of the mouth and trim the excess.  This can also be delegated.
7. Cement the appliance as your normally would.

The Triad gel addition before cementation creates a truly customized appliance with a very intimate adaptation to the patients soft tissue.  This will virtually eliminate emergencies since nothing will be able to lodge underneath the acrylic and cause discomfort.  Also, by having a custom surface, you reduce any pressure points during the use of the Nance button.  When you remove the appliance, you will be amazed at how healthy the tissue looks.

Please feel free to comment or ask questions below.


Saturday, October 11, 2014

How to Control Open Bite Tendencies with Fixed Appliance Therapy


In the old days of orthodontics, the rule for patients who were vertically challenged was to not bracket the second molars.  Bracketing the lower 7s especially was viewed as a way to open the wedge and create a true open bite in a susceptible patient.  This approach was clearly a compromise since not bracketing the 7s allowed them to "wander" and sometimes resulted in a weird final occlusion.

The current approach is the opposite.  In general, you want to bracket the lower 7s as soon as possible.  Uppers also if they are available.  Then if you fear opening the bite is a possibility, you place a bonded bite turbo on the buccal cusps of the lower second molars.  If the lower 7s are not available, you can do the same thing with the last tooth in the lower strap up, the first molar, and then duplicate this when the lower 7s erupt.

At the same time (first or second visit) you ask the patient to wear vertical elastics (deltas) from the upper 3s to the lower 3s and 4s.

The idea is to prevent bite opening by keeping the molars intruded and supplementing the action of the masticatory muscles with elastics.

Finally, when bracketing the upper second molars, be very careful about accidentally extruding the 7s.  This is best accomplished by setting the bracket height to no more than 2 mm below the cusp tip. Rick McLaughlin calls this approach "hanging the bracket in space" since it seems that it is barely on the tooth.

Please feel free to comment or ask questions below.

Sunday, February 24, 2013

TAD Procedures to Increase Success


Recently, I was chatting with a resident and he stated that he had recently lost 60% of the TADs he had placed and was wondering what he was doing wrong.  Not just residents relate these kinds of frustrations.   An experienced orthodontist was also telling me that he could not understand the hoopla about TADs since he has lost 80% of the ones he has inserted.  He then answered my next question on who was placing the screws and he told me an OS and a periodontist.  That is a mistake.  You must place your own.

I've placed 800 TADs but certainly I lost a lot of them in the beginning.  On the other hand, I’ve lost only one since September in my office. Here is a short list of things to be aware of when you’re doing TADs:
 1. Generally, TADs work best if you use them as part of your original treatment plan and not as a bail out when something goes wrong. They can be used for that but generally they don’t work as well
2. before inserting a TAD, have the patient rinse with Peridex for one minute
3. you should insert the TAD slowly. Some people have said that it should take you a minute to fully insert a single TAD 4. if I am inserting a TAD between the roots of the maxillary second bicuspid and maxillary first molars, I almost always diverge the roots first using a Z bend on a 14 steel (Australian) wire.  Depending on the case, I might not even worry about levelling the rest of the teeth until the second bicuspid root is diverged.
5. I may also do this in the mandible but it seems less necessary as a routine recommendation.  It’s generally always a good idea in the maxilla
6. there are certain locations in which TADs work best and I almost always use those locations. If you choose to use a different location you can expect to have a higher failure rate. Those locations are as follows: (1) The only real location that is predictably successful on the buccal of the maxilla is the surface between the five and the six.
(2) There are four locations on the palate.  (2a) inter-radicular between the 5 & 6.  (2b) inter-radciular between the 6 & 7 (2c) mid palatal at the level of the mesial of the first molar and (2d) mid palatal at the level of the mesial of the first bicuspid.  This is also just about where the third rugae if located.
Anyplace else you can expect a higher failure rate.  Learn to adapt your mechanics to these predictably successful insertion areas.

Finally, I use three TAD systems in my office.  On the buccal surface in the maxilla or mandible, I only use C-implants unless there is some special reason not to.  What I really like is the C-Implant comes in two pieces and it is designed to partially osseointegrate.  You insert the first part of the C-implant flush with the gingiva and allow it to rest unloaded for 6 weeks.  It partially integrates during those six weeks.  And  since nothing protrudes from the gingiva, there are no occlusal forces on the TAD during those initial six weeks.  After six weeks, you attach the second piece and load it.  I rarely lose these TADs.
On the palate, I really like the IMTEC implant system from Unitek.  I use the 6mm anteriorly in the palatal midline and the 8 mm between the roots of the 5-6 area.  The 10mm goes between the 6-7 roots.   The IMTEC comes with a stainless steel cap that allows me to solder an auxiliary.  This auxiliary typically is used to stabilize the adjacent tooth for indirect anchorage.  You can do the same thing by bonding a wire from the adjacent tooth to say a Vector TAD but my staff does not like me “fiddling” with that and using valuable chair time.  Using the IMTEC system requires an alginate impression and then some lab work.  When the patient returns, the DA can bond the wire to the tooth and therefore I am not tied up at one chair for an extended time perio.
 Finally, to close open bites, I place the OrthoTechnology Spider screw in the mid palatal area at the level of the mesial of the first molar and connect a niti spring from a TPA to the TAD. Have the TPA made first and then you can use it as a guide where to place the TAD.  I like the 1.9mm diameter and 5mm long screw .  Bigger is better as we all know and the larger diamter really seems to stabilize things.  Using a length of 5 mm prevents inadvertent insertion into the nasal floor.