Saturday, June 16, 2018

What If Parents Refuse Extractions?

Recently, there was a post in Orthotown that most orthodontists would think was a four bicuspid extraction case.  The parents refused to have extractions done, and the orthodontist who posted was wondering what the members of the group would do if it were their case.

Here is the post from Orthotown:

http://www.orthotown.com/MessageBoard/thread.aspx?s=6&f=693&t=309675

Here are a few of the images from the article.


Now when parents disagree with me in a similar kind of situation, I try to remember to ask them why they made the comment about "no teeth out."  Two responses I've had over the years have been (1) "you treated my other daughter and when she had teeth out for braces, her thumb went numb", and (2)"I had teeth out when I was younger and I still have gaping holes."  On the second comment, I asked the mother if she had braces when she was younger and she related that she did not.  I then opened Dolphin Aquarium and showed her what would happen when the braces were placed in conjunction with extractions.  Of course, the extractions sites were all closed. That was all it took for the mother to say, "Oh, OK.  I understand.  I'm fine with teeth out."  In the first comment, I talked a little about the fact that it was very unlikely that the two events were related and the parents agreed with me and went ahead with extractions.

So it is very important for you to ask follow up questions when parents say something that is not the expected response.  Depending on the response I get after asking the parents to explain their comment, I will often follow up by telling them that my responsibility as a professional is to help them make a decision with which they are comfortable, whatever decision that is.  I then go on and explain that we would like to get records today and then have them back at 4:30PM some evening so they will be the last patients of my day and I can then explain in detail my rationale without any time constraints.  Usually, when they understand the issues involved, they will go along with my recommendations.  Not always though, and as you can imagine, it frequently happens when I mention surgery.  Nonetheless, I've done the professional thing and explained the issues involved and allowed them to come to an informed consent about treatment.  Of course, if I feel strongly about, for instance, extractions, and they don't go along, I have every right to refuse to treat and to help them find another practitioner.  That is my right as a professional but at least they hopefully feel good about what I've tried to do for the benefit of their child.

Thursday, March 23, 2017

Pediatric Sleep Apnea

Recently, I had lunch with a new orthodontist and the subject of pediatric sleep apnea came up. There is a lot of smoke but very little fire on this subject.

We would all love to be able to expand the arches, yes both arches, and turn a mouthbreathing, poor sleeping, underachieving 8 year old into a world class athlete with Einstein level smarts.

There are some published articles on this subject but not a lot.  Patients with posterior cross bites tend to respond well to this kind of treatment.  What we all want if for patients without posterior cross bites to also respond well to this kind of treatment and that is where the science stops.

Schein wants you to buy an iCat and they encourage you to take their airway course and invest in that kind of technology.  Again, not a lot of research supports what the iCat images say.  And interestingly, a good percentage of pediatric airway patients improve spontaneously without treatment within 12 months of diagnosis.

The best material on this subject, if you want actual evidence, can be found on Kevin O'Brien's blog.

1.

http://kevinobrienorthoblog.com/breath-breath-air-dont-afraid-care-sleep-disordered-breathing-orthodontic-treatment-part-1/

2.

http://kevinobrienorthoblog.com/breathing-influence-facial-growth/

3.

http://kevinobrienorthoblog.com/breathe-breathe-in-the-air-part-3-orthodontic-treatment-cure-childhood-breathing-problems/

Saturday, February 13, 2016

"No Problem"

A week ago I was in the Waterville Starbucks (there is only one in our town) and asked for a Grande Nonfat Cappuccino with half a Splenda.  The cashier took my money and wrote the order on a hot drink cup.  When the barista saw the cup, she asked me “Half a Splenda?”  After I replied in the affirmative, her response was “No problem.”

Of course it was “no problem”, I was the customer.  I was her reason for existing for the minute it took to make my drink.  So I was determined to make sure my office staff did not say “No problem” in similar circumstances.

At huddle the next morning, I went over the incident and offered the suggestion that “Certainly” or “My Pleasure” would be more appropriate responses.

This past Friday morning, our team had 90 minutes of verbal skills training with Jodi Peacock focused mainly on skills for the “The New Patient Phone Call.”  At the conclusion of the training session, Jodi closed with one final comment: She said she hated it when she was interacting with a receptionist or cashier and the response she received instead of being “Thank you” or “Certainly” was “No problem.”

To which one of my staff immediately replied, “Did Dr. Ruff put you up to that?”  And of course, I had not.

Sunday, May 3, 2015

Technique for Almost Painless Palatal Anesthesia

As stated previously, some clinicians (Sebastian Baumgaertel) claim that a palatal miniscrew can be inserted with a strong topical anesthetic only.  While I think that is probably true, the one time I tried it I could tell that the patient felt something.  Obviously, I don't want that to happen on a regular basis so I combine a strong topical with local anesthetic using an ultra small needle.

In the next blog post, I will talk about the verbal skills needed to compliment this technique.

Depending on your state law, the initial part of this technique can be delegated.  Either in my treatment plan or my "Next Time Notes," I will make an entry like "Two palatal TADs, 3rd rugae."  This let's my orthodontic technician know where to place the topical.  We also review all TAD insertions at morning huddle.

So after the technician seats the patient and obtains a blood pressure and pulse reading, they then evaluate the situation and confirm that the "Next Time" notes are correct and we will be placing a TAD or two today.  The technician explains the procedure to the patient and tries to assess the patient's anxiety level.

The technician dries the palatal mucosa with gauze and uses a Q-tip to place the Profound* gel over the area of the 3rd rugae.  It is covered with several layers of gauze which the patient is instructed to hold in place for 5 minutes.  It is then rinsed off and the technician will signal me that we are good to go to do the local anesthesia.  Typically, the time between initial application of the Profound gel and the actual insertion of local is 8 minutes so usually the tissue is pretty numb at that point.

I'll then explain again to the patient what to expect (more next time) and mark the tissue area with an intra-oral marker.

I will then insert the needle into that area.  I usually bend the needle 45 degrees if I the insertion site is left of the midline and 90 degrees if right of the midline.  The tissue is thin in this area so go slow to avoid impinging on the periosteum and causing pain.

I keep injecting very slowly until I've accomplished three clicks of the syringe.  That is a total amount of anesthesia of 0.18 ml or 10% of a 1.8 ml carpule.  You will notice a blanching of the tissues.  I'll then immediately check the level of anesthesia with a perio probe by making a hole in the tissue in each area.  I'll explain to the patient that what they just felt was me making two holes (one of each side) in their gums.  They are always amazed that they felt nothing.  You always can start inserting the screw immediately after finishing injecting.

I use a Rocky Mountain Orthonia electric torque driver to insert the TAD.  It is set at 30 RPM and 30 NCm of torque.  To the best of my knowledge, it will accept the contra angle driver from all TAD manufacturers.

I'll place it in the proper area and make sure the angle of the driver is correct and then place my finger on top of the head of the driver to create some downward pressure to help the screw penetrate the bone initially.  Then I'll remove my finger after the screw is about 50% in.  Repeat on the other side if appropriate.


Most TAD systems have impression caps that are placed over the TADs at this point prior to taking an impression (see below).


To capture the most precise impression possible, I combine alginate with impression compound (brown).  The impression compound gives a very rigid impression to help stabilize the impression caps without any float.


 You soften the end of a stick of brown impression compound until it slumps and then immerse in water.  Mold it with your gloved fingers into a thick wafer, reflame it to soften the tissue surface and blow some water on it to cool it.  Then place it in the mouth adapting it to the screws.  Spray it with air to harden it.  Take a routine alginate impression.  When you remove the impression tray, the compound and the impression caps will usually come out with the alginate.

Take it to the lab and insert analogs into the caps.  Pour in yellow stone.

If there is any doubt about the stability of the compound or the impression caps, I will stabilize them with cyanoacrylate.

Addendum:  Three days after I posted this, I did two palatal screws on a dental assistant from my dentist's office.  She was pretty anxious about the idea of palatal anesthesia.  After I was done, she stated that it was really nothing to it at all.  Certainly, no more uncomfortable than buccal infiltration.  She was really amazed.


*
http://www.woodlandhillspharmacy.com/profound_gel.html

Thursday, February 5, 2015

Palatal Anesthesia Is Not The Big Bad Wolf of TAD Placement!!!


I bet you that many orthodontic residents decided to pursue the specialty of orthodontics because they had hoped to avoid all those nasty dental things like local anesthesia.  Unfortunately for them, since the advent of TADs, local anesthesia is a necessary skill in the orthodontic armamentarium.  And now, to make matters worse, we have all the miniscrew gurus saying that the best location in which to place a TAD is to insert it into the anterior palate where the bone density is ideal for TAD retention.  Oh no!  Not only is this local anesthesia but it is in an area where most dentists fear to tread.  Kind of like a double whammy.

I was lucky when I went through the orthodontic program at Tufts.  I had the chance of working as a general dentist Tuesday and Thursday evenings and all day Saturdays.  This was in a private fee for service practice where virtually every patient was an adult already treatment planned for restorative and they all were treated with local anesthesia.  I became very comfortable with the concept so it was easy to transfer those skills to the use of miniscrews.

I think the first key to doing palatal anesthesia in a patient friendly manner is to use the smallest needle available which is not a 30 gauge as most think but a 33 gauge ultra short.  A 33 gauge needle is approximately 30% smaller in diameter than a 30 gauge.  That is a big difference.

The second key is to use a strong topical anesthetic.  Some people claim that a strong topical is enough to allow you to insert a miniscrew without even local anesthetic.  I am unwilling to be that brave, nonetheless, I figure, if that is true, I can use that kind of strong topical to prior to local anesthetic.


The third key is to realize that because of the extremely small diameter of the 33 gauge needle, there will be a fair amount of back pressure so instead of using a standard syringe, you will need to use a intraligamentary syringe.  These typically have a lever arm and not a plunger.  Also,  the syringe looks more like a pen and I think that helps relax the patient.
I like the one from Septodont called a Paroject syringe.  It has a lever arm to dispense the solution.  It takes 30 activations of the lever arm to empty a 1.8 ml syringe and only 2 or 3 activations for adequate anesthesia to insert a palatal miniscrew.

Next time: Technique

Thursday, December 4, 2014

One Easy Way to Reduce Treatment Time and Broken Braces


In a previous posting, I talked about controlling vertical growth problems by placing composite resin or glass ionomer cement on the occlusal surface of terminal molars.  You can also place composite on the lingual of upper anterior teeth.  How do you decide which to do? If you want to intrude molars (think open bite), use posterior turbos.  If you want to extrude molars (think deep bite) use anterior turbos.


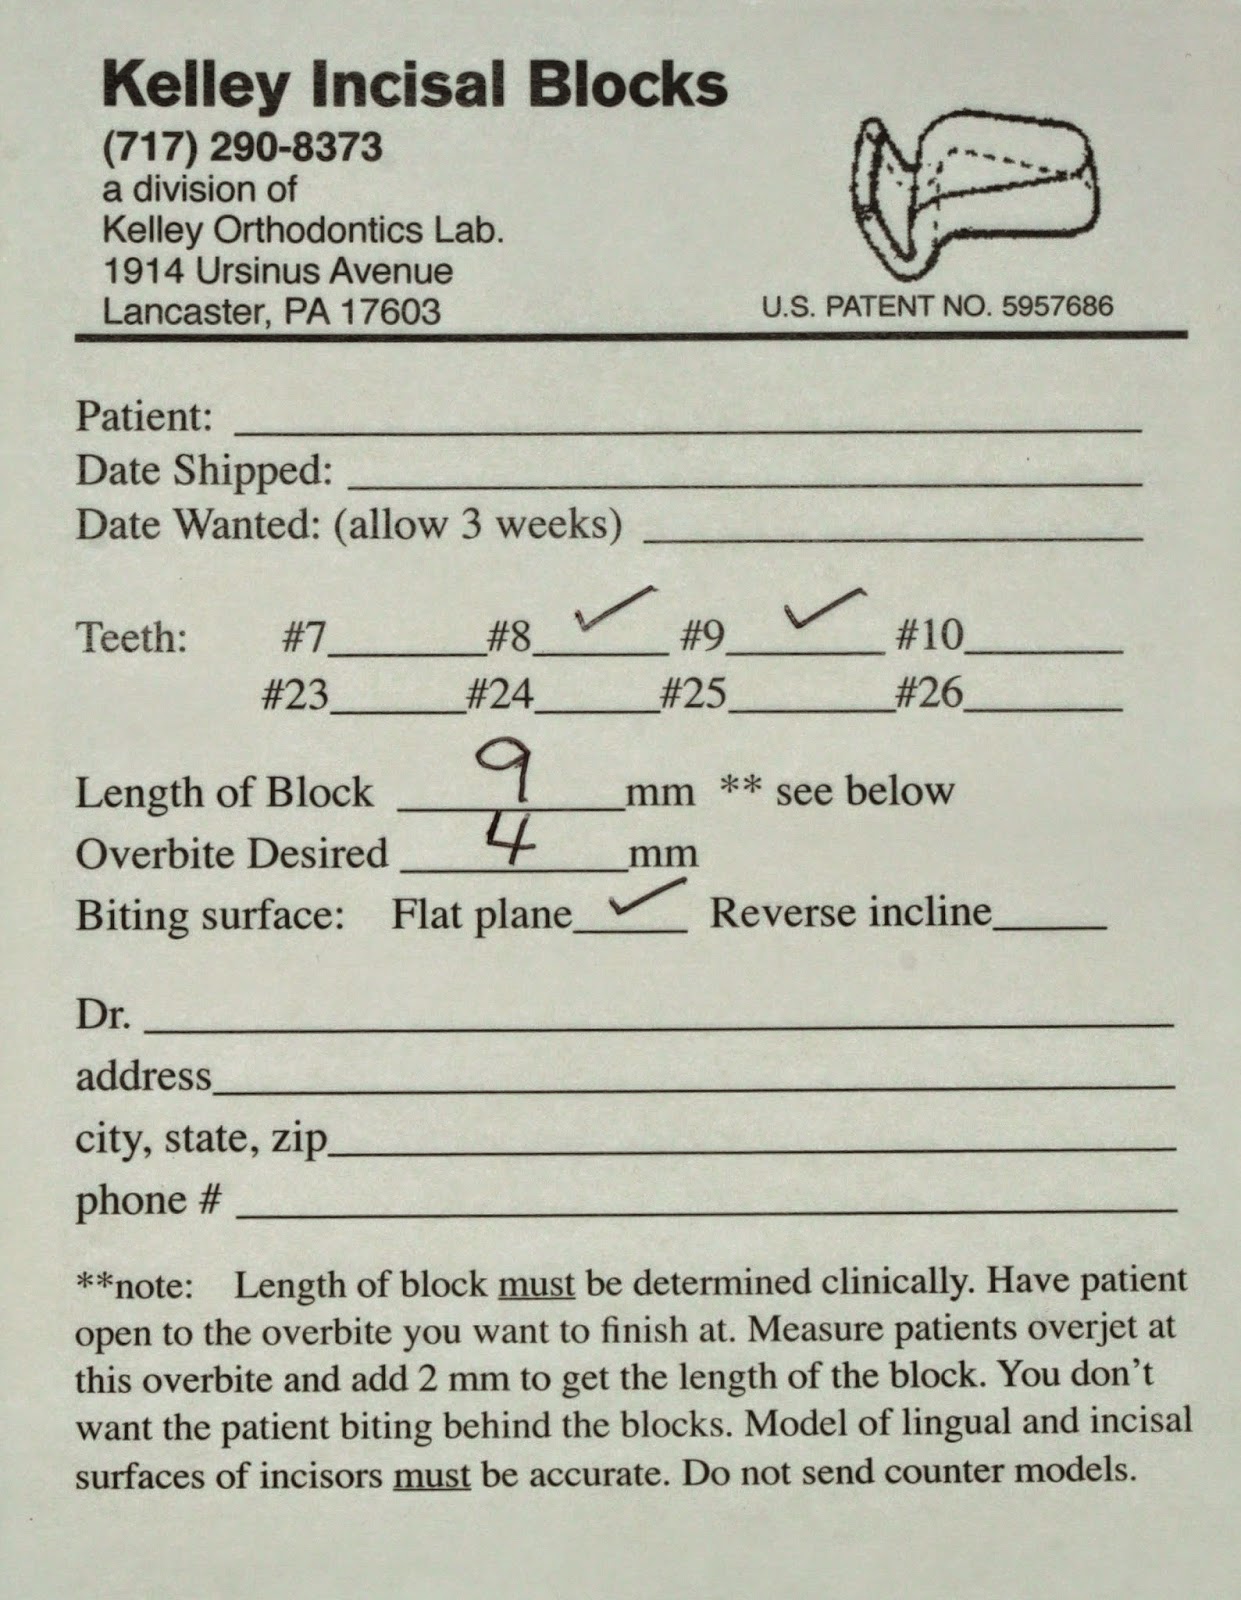
The best way to do anterior turbos to extrude molars is with custom turbos from Kelley Incisal Blocks Laboratory.  You merely obtain an anterior alginate impression and, on the lab sheet, you specify how much overbite you want to finish with.  I usually ask for 4 mm.  You also have to specify the length of the block.  This means how much overjet there is between the incisors when there is 4 mm of overbite.  This must be determined clinically but I usually just ask for 9 mm and cut away what I don’t need.  Almost always they are placed on the central incisors but can be placed on the lateral incisors if appropriate.


To bond these into place, you merely micro etch or pumice the lingual of the upper central incisors and then either traditional etch for 30 seconds or use a L-pop for 5 seconds.  Place  a generous amount of flowable composite on the custom turbo surface that faces the tooth.  No bonding resin required.*  Then place the custom turbo on the tooth.  The cap insures that it is at the proper height.  Do not etch the incisal 1 mm of the tooth so that the cap will be easy to remove.

*No sealant makes it easier to remove the cap at the end of this phase of treatment.  If you are dealing with a deep bite particularly in a teenage male carnivore, use Assure or something similar to enhance bond strength.


Light cure for 30 seconds.  Then use a #8 round bur in a slow speed to remove the cap and to smooth out the lingual anatomy as necessary.  You can advise light chewing for the next 24 hours but these things are pretty rugged and they rarely come off.  Depending on your state laws, all of the above can be delegated.  Finally, mark with blue paper and decide whether you need to full 9 mm or you can remove the excess with a straight diamond in a high speed.


In the photo below right, you can see I cut back on the length of the block.  I usually leave the turbos in until I am in a full size lower working wire.  For me that is a 19x25 in a 22 slot.  So that usually means 6 months.  You only have to grab the sides of the turbo with a How plier and squeeze once or twice to remove it.  Typically this fractures the cement and the turbo comes off.

Some people like to put these on during space closure if extractions were done or even in a deep bite non extraction case.  By opening the bite, you facilitate tooth movement.
                                                                           
Please make any comments or ask any questions below.


Thursday, November 13, 2014

Modifying a Nance Button To Use As a Bite Plane


While I use turbos of all sizes and locations, sometimes using a bite plate is the way to go.  Unfortunately, patients don’t seem to like removable bite plates as much as orthodontists like them.  So following the lead of my restorative colleagues (“I do fixed everything if possible, nothing removable”), I started doing fixed bite plates quite some time ago.

You start with a Nance button (see my post of October 11, 2014) and then extend the acrylic up on the lingual of the central and lateral incisors. (see the first image)

After curing the acrylic and removing the Nance from the model, you will notice that the underside of the acrylic that touches the central and lateral incisors has the images of those teeth.  You need to polish the images of those teeth away.  (see the 2nd and 3rd images)  If the acrylic does not actually touch the lingual of the upper incisors, you have nothing to worry about as far as decals go.  Please note that I did not trim the acrylic on the lingual of the laterals since I had planned to grind away that entire area.

Please make any comments or ask any questions below.

In my next post, I will discuss several different approaches to posterior and anterior turbos.


Sunday, November 2, 2014

Improving Nance Button Use


Now that many of us have migrated our anchorage needs to miniscrews, there is less call for Nance buttons as anchorage enhancers.  They still have a use though.  Here are some ideas on optimizing the use of Nance buttons as well as reducing patient problems:

1. Keep the acrylic portion as large as possible.  Think half dollar not nickel sized acrylic.  The use of larger acrylic buttons reduces the pressure in any particular area.
2. Don’t impinge on the incisal papilla.
3. Ask your lab to use Triad gel for the acrylic portion and not to treat the tissue side of the acrylic with any type of oxygen barrier to eliminate the oxygen inhibition layer.
4. When delivering the appliance, place a thin layer of Triad gel on the entire tissue surface and seat the appliance to the same degree you would if cementing it.  This can be delegated.
5. Light cure the Triad gel in the mouth for 15 seconds.  It gets very warm so don’t overdue the curing time.  This can be delegated.
6. Continue to light cure out of the mouth and trim the excess.  This can also be delegated.
7. Cement the appliance as your normally would.

The Triad gel addition before cementation creates a truly customized appliance with a very intimate adaptation to the patients soft tissue.  This will virtually eliminate emergencies since nothing will be able to lodge underneath the acrylic and cause discomfort.  Also, by having a custom surface, you reduce any pressure points during the use of the Nance button.  When you remove the appliance, you will be amazed at how healthy the tissue looks.

Please feel free to comment or ask questions below.


Saturday, October 11, 2014

How to Control Open Bite Tendencies with Fixed Appliance Therapy


In the old days of orthodontics, the rule for patients who were vertically challenged was to not bracket the second molars.  Bracketing the lower 7s especially was viewed as a way to open the wedge and create a true open bite in a susceptible patient.  This approach was clearly a compromise since not bracketing the 7s allowed them to "wander" and sometimes resulted in a weird final occlusion.

The current approach is the opposite.  In general, you want to bracket the lower 7s as soon as possible.  Uppers also if they are available.  Then if you fear opening the bite is a possibility, you place a bonded bite turbo on the buccal cusps of the lower second molars.  If the lower 7s are not available, you can do the same thing with the last tooth in the lower strap up, the first molar, and then duplicate this when the lower 7s erupt.

At the same time (first or second visit) you ask the patient to wear vertical elastics (deltas) from the upper 3s to the lower 3s and 4s.

The idea is to prevent bite opening by keeping the molars intruded and supplementing the action of the masticatory muscles with elastics.

Finally, when bracketing the upper second molars, be very careful about accidentally extruding the 7s.  This is best accomplished by setting the bracket height to no more than 2 mm below the cusp tip. Rick McLaughlin calls this approach "hanging the bracket in space" since it seems that it is barely on the tooth.

Please feel free to comment or ask questions below.

Sunday, February 24, 2013

TAD Procedures to Increase Success


Recently, I was chatting with a resident and he stated that he had recently lost 60% of the TADs he had placed and was wondering what he was doing wrong.  Not just residents relate these kinds of frustrations.   An experienced orthodontist was also telling me that he could not understand the hoopla about TADs since he has lost 80% of the ones he has inserted.  He then answered my next question on who was placing the screws and he told me an OS and a periodontist.  That is a mistake.  You must place your own.

I've placed 800 TADs but certainly I lost a lot of them in the beginning.  On the other hand, I’ve lost only one since September in my office. Here is a short list of things to be aware of when you’re doing TADs:
 1. Generally, TADs work best if you use them as part of your original treatment plan and not as a bail out when something goes wrong. They can be used for that but generally they don’t work as well
2. before inserting a TAD, have the patient rinse with Peridex for one minute
3. you should insert the TAD slowly. Some people have said that it should take you a minute to fully insert a single TAD 4. if I am inserting a TAD between the roots of the maxillary second bicuspid and maxillary first molars, I almost always diverge the roots first using a Z bend on a 14 steel (Australian) wire.  Depending on the case, I might not even worry about levelling the rest of the teeth until the second bicuspid root is diverged.
5. I may also do this in the mandible but it seems less necessary as a routine recommendation.  It’s generally always a good idea in the maxilla
6. there are certain locations in which TADs work best and I almost always use those locations. If you choose to use a different location you can expect to have a higher failure rate. Those locations are as follows: (1) The only real location that is predictably successful on the buccal of the maxilla is the surface between the five and the six.
(2) There are four locations on the palate.  (2a) inter-radicular between the 5 & 6.  (2b) inter-radciular between the 6 & 7 (2c) mid palatal at the level of the mesial of the first molar and (2d) mid palatal at the level of the mesial of the first bicuspid.  This is also just about where the third rugae if located.
Anyplace else you can expect a higher failure rate.  Learn to adapt your mechanics to these predictably successful insertion areas.

Finally, I use three TAD systems in my office.  On the buccal surface in the maxilla or mandible, I only use C-implants unless there is some special reason not to.  What I really like is the C-Implant comes in two pieces and it is designed to partially osseointegrate.  You insert the first part of the C-implant flush with the gingiva and allow it to rest unloaded for 6 weeks.  It partially integrates during those six weeks.  And  since nothing protrudes from the gingiva, there are no occlusal forces on the TAD during those initial six weeks.  After six weeks, you attach the second piece and load it.  I rarely lose these TADs.
On the palate, I really like the IMTEC implant system from Unitek.  I use the 6mm anteriorly in the palatal midline and the 8 mm between the roots of the 5-6 area.  The 10mm goes between the 6-7 roots.   The IMTEC comes with a stainless steel cap that allows me to solder an auxiliary.  This auxiliary typically is used to stabilize the adjacent tooth for indirect anchorage.  You can do the same thing by bonding a wire from the adjacent tooth to say a Vector TAD but my staff does not like me “fiddling” with that and using valuable chair time.  Using the IMTEC system requires an alginate impression and then some lab work.  When the patient returns, the DA can bond the wire to the tooth and therefore I am not tied up at one chair for an extended time perio.
 Finally, to close open bites, I place the OrthoTechnology Spider screw in the mid palatal area at the level of the mesial of the first molar and connect a niti spring from a TPA to the TAD. Have the TPA made first and then you can use it as a guide where to place the TAD.  I like the 1.9mm diameter and 5mm long screw .  Bigger is better as we all know and the larger diamter really seems to stabilize things.  Using a length of 5 mm prevents inadvertent insertion into the nasal floor.

Sunday, July 8, 2012


Continuing Education


Here is a recent sports headline.  It describes the Minnesota Wild acquiring two free agents and the fact that the season ticket sales went "Wild."  Nice play on words.

One of the things I've seen for years is the lack of commitment by recent grads to continue their education.  Think about how much you've already spent and it was not deductible.  Now every dollar you spend on CE is reduced by your overall Federal and State tax rates.  For instance, spending $2000 on a course and travel seems like a big investment when not much is coming in.  If, however, you don't spend the money, you will pay taxes on that full amount.  If your overall tax rate is 40% now, that means you will keep at the end of the year $1200 of the $2000.  Spend the $2000 on a course and you don't pay taxes on that money since you no longer have it.  So the course costs you $1200 in real money not the $2000 it seems to cost at first glance.  Talk to your accountant if this does not seem perfectly clear.  Spend it or lose it.  Up to you.

Now back to the headline.  I see new residents build a new office and feel they have to compete in esthetics with the guy down the street so they max their buildout and have nothing left for CE.  Big mistake. Business people like the Krafts who own the Patriots don't say "I can't afford to buy new free agents.  I'll wait until I earn some more money."  They say "Let me put a winning team on the field and the money will come."  And that is what happened to the Wild.  They ramped up their team and ticket sales exploded.

Now there is a lot of CE on the web.  I would encourage you to look at Ormco, Unitek, Invisalign, etc for economical ways to enhance your skills.  When you travel for a course, do your due diligence and find out the best courses to take.  Usually, this mean two days with one doc not two days at a national meeting.  Those meetings are for socialization.

Things to consider:

McLaughlin's in office course
Warshawsky's Incognito in office course.
Cope TAD in office course
if you like 18 slot, Wick Alexander's in office course
if you want more on TADs, 2 days with Ludwig in Germany
3 days with Tim Tremont in  Pittsburgh for Dx and Tx Planning

Wednesday, June 6, 2012

You Wear Those Things in the Office?

About five years ago, at one of my orthodontic study club meetings, the topic was "Pearls."  Each member was supposed to speak for 20 minutes on either a clinical pearl or a management pearl.  One of the things I talked about was loupes.  One of the members looked at me like I was crazy and said, "You wear those things in the office?"  I explained to him that I wear them for everything I do except greeting new patients.  I'm sure he thought I had gone around the bend.  Interestingly, though, I was in his office two years later and he was wearing loupes.

Last Monday, our Waterville dentist lunch group met and the endodontist was asked about loupes versus an operating microscope.  He said that he had microscopes in each operatory but usually his loupes were enough.  One of the gp's mentioned that if his loupes were broken, he would just stay home until he had a new pair.  Of course, he said, that was why he had two pair.

So the last time I was at Tufts, Doug asked if he could try my loupes on since the ones he had from school were had too narrow a field of vision.  Mine are Oroscoptic 2.6 and he thought the field of vision was much better for orthodontic purposes than what he used in dental school.

As this was going on, a second year resident asked "Why do you wear those things?"  Sound familiar?  I explained that everything I do is easier with loupes.  For instance, when I cement a band, I don't try hard to have it super tight.  I want it finger tight and then I rely on the Unitek Multicure to keep it where I place it.  I use How pliers and loupes to position it exactly.  Believe me, looking at it through loupes is a whole different thing than looking at it with naked eyes.

A little while later, the same resident asked me for my help removing a rectangular AW.  It seems that the resident could not pull the wire out on the right side.  I looked and saw a very slight bend in the wire distal of the LR7 tube.  The resident did not see this.  As soon as I straightened the wire, it came right out.

If you have loupes, give them a try for orthodontics.  You won't regret it.  Remember anything that helps you work better and faster, means more profit.


Tuesday, May 22, 2012


The Key to Non Extraction Orthodontics
If you want to do more cases non extraction (at least in the lower arch), you need to see patients as the first bicuspids are erupting.  In my practice I call this point in time a “decision point.”  The patient may or may not be ready for braces but at this point it is possible to treatment plan the patient to know in which direction you should go for successful treatment.
According to the late Dr. Gianelly, 75-80% of patients can be treated non extraction in the lower arch if all you do is to maintain “e” space.  I’ve followed Dr. Gianelly’s teachings in this regard for over 25 years and it has greatly simplified things for me and allowed me to achieve more predictable, high quality results.
No need to expand the arches, no need to extract lower second molars, no need to do Damon.  Just straight forward, good quality orthodontics and you have 4 chances in 5 of a simple non extraction treatment plan.
Also consider that 40% of our patients have small maxillary laterals.  This usually means that the lower anterior teeth need a little IPR.  Let’s say 2 mm is about right.  If you add that into what you gain in preserving “e” space, I think that takes you into the realm of 90% non extraction as long as you see the patient as the lower first bicuspids are erupting.
The mistake that some make is to look at an eight year old and see that they’ve lost “5 to get 4” or 4 deciduous incisors and a deciduous cuspid.  This looks like 8 mm of crowding so they start thinking about extracting 4s.  If you take the “e’s” into account though, it becomes 3 mm of crowding which might be handled by IPR or at worst the extraction of lower 5s not 4s.  Extracting a lower incisor also might work well if the upper 2s are small.

Thursday, March 1, 2012

Palatal Anesthesia


Palatal Anesthesia

One of the things that really stands in the way of a fuller utilization of TADs is the need for anesthesia.  Since many orthodontists have never practiced general dentistry, they are especially fearful of of “the needle” maybe even more fearful than some of their patients.  Compounding this fear is that the palate is a better location than the maxillary buccal surfaces for miniscrews in many situations.  I once heard an idiot at an orthodontic meeting state that he did not believe in miniscrews because he had an office policy not to hurt patients.

Probably, the thing you don’t want to use is the traditional syringe.  The sight of that upsets a good number of patients and I find that it is hard for me to control the amount of anesthesia I try to deliver so I probably over do it which makes it painful.

My personal preference for palatal anesthesia is to use TAC Alternate 20% topical anesthesia from Professional Arts Pharmacy* followed by injection with Septocaine or lidocaine using a Septodont Paroject intraligamentary syringe.  This syringe looks like a pen and is less threatening than the traditional syringe.  I also use a 33 gauge needle.  The lever arm on this syringe makes the use of the 33 gauge needle feasible by easily overcoming back pressure.

Protocol:  Dry the area to be anesthetized and place the TAC Alternate 20% for 5 minutes.  Keep as dry as feasible while waiting.  Wash off and wait 3 more minutes.  Using the technique described by Dr S Malamed in his text, very, very slowly inject a small amount of Septocaine.  Usually 1/10 of a carpule is plenty.  That is three activations of the lever arm.  Go as slow as you can.  It should take at least one minute or longer.  If you place the anesthesia directly in the area of screw placement, you can begin to insert the miniscrew immediately.  This works very well.

Alternatives: Baumgaertel feels that the TAC Alternate 20% topical is enough without resorting to the any injection.  He would follow my protocol for 5 minutes and then 3 minutes and then insert the miniscrew.  If the patient feels uncomfortable at that point, you can reapply the TAC or resort to an injection.  I feel that, if Baumgaertel is right, then they should not feel the Paroject injection and that assures me that they will be comfortable for the screw insertion.

Razavi, who teaches with Baumgaertel at Case Western and speaks for Unitek on the IMTEC miniscrew system, tends to agree with Baumgaertel unless the tissue is more than 2 mm thick.  He feels that is the limit of topical anesthesia.  He will use a MadajetXL in areas of thicker tissue.  As a general rule, the tissue is 2 mm or less in most areas we would choose anterior to the mesial of the maxillary first molar in the palate.  Perhaps if you were more than 8 mm from the gingival margin of the first molar, tissue would be thicker than 2 mm.


Speaking of the MadajetXL, that is part of Jason Cope’s protocol.  He will use DepBlu** which is a variation of TAC Alternate.  After the DepBlu sits for 5 minutes + 3 minutes, he uses a MadajetXL routinely.  For those not familiar with a MAdajectXL, it is like a water pistol for local anesthesia.  It uses pressure but no needle to insert the local anesthesia under the tissue.  By doing that, the deeper tissues can be anesthetized although this might take several applications of the MadadjetXL.

*TAC Alternate 20% is available from Professional Arts Pharmacy in Lafayette, LA.
http://www.professionalarts.com/

**DepBlu is available from Stevens Pharmacy of Costa Mesa, CA.  There is a name change.  The dbg ( formarly depblu ) has lidocaine 10% prilocaine 10% tetracaine 4% and phenylephrine 2% sweetened with Stevia.
http://stevensrx.com/

The syringe I use is from Septodont.  It is called a Paroject.
http://www.septodontusa.com/products/paroject?from=10&cat=4

The Madajet XL is from Mada Medical.  It costs $600 but that compares very favorably with a Syrijet II which is $1800 and is similar.
http://www.madamedical.com/merchant.mv?Screen=CTGY&Store_Code=MM&Category_Code=MXD


Sunday, January 15, 2012

Handling Post Treatment Relapse


Recently, Dr. Cartsos asked me about using Invisalign express to treat some simple orthodontic problems or some relapse orthodontic problems. After explaining to her that I didn't believe in Invisalign express because it was too limiting, I turned to one of the residents listening in, and asked him what he would do if he had a relapse problem after braces removal.
His response was the response I expected which was to use some type of removable retainer like a “spring clip” Hawley retainer. It's important to understand your orthodontic history in understanding why the spring clip Hawley retainer still exists as a choice in our armamentarium. Not only should it be your last choice but it should be no choice.
In the old days, as some of you know, it was necessary to construct braces from scratch. That was orthodontist and staff intensive as far as work. That isn't done anymore nor do we even do anything as labor-intensive as fitting lower incisor bands. When it was necessary to construct bands, figuring out a simpler way with the Hawley retainer seemed like a good idea. Additionally, I think it was much more common for patients to be prepared to wear a removable retainer as part of their orthodontic treatment. Recently, Georgios Kanavakis asked me what kind of removable appliances I used in my orthodontic practice. My response was, after some thought, that the only removable appliance I used was an upper retainer after the braces were removed.  To ask a teenagr girl to wear a spring clip Hawley 24/7 is a nonstarter.
So if I was in a situation where I had some minor tooth movement during the retainer phase of treatment, I would think of several options that I might use:
1. My 1st choice would be braces. It is so simple and it works so well. We have the most sophisticated braces available now so why use something as primitive as a removable retainer. If you had to use a removable retainer, the orthodontist would then spend a fair amount of his or her time adjusting it at subsequent visits. I don't want to do that. So I would rather take an indirect impression (done by a dental assistant), do a small amount of lab work (done mostly by a dental assistant with only a small amount done by me), deliver the indirect set up (all done by a dental assistant) place an 18 super elastic arch wire (done by a dental assistant) and then retie this arch wire at each subsequent visit (done by a dental assistant). This way there is virtually no work required by the orthodontist other than what we normally do by monitoring treatment. If the patient had been a good patient during the active phase of treatment, I would do this for no fee and consider it part of my marketing especially if the patient’s mom had referred her friends. By using lower braces I'm also testing the patient's commitment to really fixing the problem. If they are not willing to wear braces, it's not that big a deal to them
2. If I suggested braces and the patient really didn't want to wear braces again but I sensed that it was important to her and to mom especially to mom, I would then suggest Invisalign. I would tell mom that I would do Invisalign for the lab fee and then add 10% to the lab fee for impressions, handling and odds and ends (all done by a dental assistant). I think that's a very fair way to handle a problem like this if braces were not an option.
3. The last way I might do this would be if the problem was a very minor one involving a single tooth. I would take an alginate impression and construct a Essix retainer with pressure on the appropriate tooth.

Introductory Thoughts

Often when I am teaching, I will get into a discussion with one or several residents about a certain aspect of orthodontic treatment.  I sometimes wish that you all could hear those "mini lectures".  So here in the blog, I hope to share those mini lectures with the entire program.