Saturday, June 16, 2018

What If Parents Refuse Extractions?

Recently, there was a post in Orthotown that most orthodontists would think was a four bicuspid extraction case.  The parents refused to have extractions done, and the orthodontist who posted was wondering what the members of the group would do if it were their case.

Here is the post from Orthotown:

http://www.orthotown.com/MessageBoard/thread.aspx?s=6&f=693&t=309675

Here are a few of the images from the article.


Now when parents disagree with me in a similar kind of situation, I try to remember to ask them why they made the comment about "no teeth out."  Two responses I've had over the years have been (1) "you treated my other daughter and when she had teeth out for braces, her thumb went numb", and (2)"I had teeth out when I was younger and I still have gaping holes."  On the second comment, I asked the mother if she had braces when she was younger and she related that she did not.  I then opened Dolphin Aquarium and showed her what would happen when the braces were placed in conjunction with extractions.  Of course, the extractions sites were all closed. That was all it took for the mother to say, "Oh, OK.  I understand.  I'm fine with teeth out."  In the first comment, I talked a little about the fact that it was very unlikely that the two events were related and the parents agreed with me and went ahead with extractions.

So it is very important for you to ask follow up questions when parents say something that is not the expected response.  Depending on the response I get after asking the parents to explain their comment, I will often follow up by telling them that my responsibility as a professional is to help them make a decision with which they are comfortable, whatever decision that is.  I then go on and explain that we would like to get records today and then have them back at 4:30PM some evening so they will be the last patients of my day and I can then explain in detail my rationale without any time constraints.  Usually, when they understand the issues involved, they will go along with my recommendations.  Not always though, and as you can imagine, it frequently happens when I mention surgery.  Nonetheless, I've done the professional thing and explained the issues involved and allowed them to come to an informed consent about treatment.  Of course, if I feel strongly about, for instance, extractions, and they don't go along, I have every right to refuse to treat and to help them find another practitioner.  That is my right as a professional but at least they hopefully feel good about what I've tried to do for the benefit of their child.

Thursday, March 23, 2017

Pediatric Sleep Apnea

Recently, I had lunch with a new orthodontist and the subject of pediatric sleep apnea came up. There is a lot of smoke but very little fire on this subject.

We would all love to be able to expand the arches, yes both arches, and turn a mouthbreathing, poor sleeping, underachieving 8 year old into a world class athlete with Einstein level smarts.

There are some published articles on this subject but not a lot.  Patients with posterior cross bites tend to respond well to this kind of treatment.  What we all want if for patients without posterior cross bites to also respond well to this kind of treatment and that is where the science stops.

Schein wants you to buy an iCat and they encourage you to take their airway course and invest in that kind of technology.  Again, not a lot of research supports what the iCat images say.  And interestingly, a good percentage of pediatric airway patients improve spontaneously without treatment within 12 months of diagnosis.

The best material on this subject, if you want actual evidence, can be found on Kevin O'Brien's blog.

1.

http://kevinobrienorthoblog.com/breath-breath-air-dont-afraid-care-sleep-disordered-breathing-orthodontic-treatment-part-1/

2.

http://kevinobrienorthoblog.com/breathing-influence-facial-growth/

3.

http://kevinobrienorthoblog.com/breathe-breathe-in-the-air-part-3-orthodontic-treatment-cure-childhood-breathing-problems/

Saturday, February 13, 2016

"No Problem"

A week ago I was in the Waterville Starbucks (there is only one in our town) and asked for a Grande Nonfat Cappuccino with half a Splenda.  The cashier took my money and wrote the order on a hot drink cup.  When the barista saw the cup, she asked me “Half a Splenda?”  After I replied in the affirmative, her response was “No problem.”

Of course it was “no problem”, I was the customer.  I was her reason for existing for the minute it took to make my drink.  So I was determined to make sure my office staff did not say “No problem” in similar circumstances.

At huddle the next morning, I went over the incident and offered the suggestion that “Certainly” or “My Pleasure” would be more appropriate responses.

This past Friday morning, our team had 90 minutes of verbal skills training with Jodi Peacock focused mainly on skills for the “The New Patient Phone Call.”  At the conclusion of the training session, Jodi closed with one final comment: She said she hated it when she was interacting with a receptionist or cashier and the response she received instead of being “Thank you” or “Certainly” was “No problem.”

To which one of my staff immediately replied, “Did Dr. Ruff put you up to that?”  And of course, I had not.

Sunday, May 3, 2015

Technique for Almost Painless Palatal Anesthesia

As stated previously, some clinicians (Sebastian Baumgaertel) claim that a palatal miniscrew can be inserted with a strong topical anesthetic only.  While I think that is probably true, the one time I tried it I could tell that the patient felt something.  Obviously, I don't want that to happen on a regular basis so I combine a strong topical with local anesthetic using an ultra small needle.

In the next blog post, I will talk about the verbal skills needed to compliment this technique.

Depending on your state law, the initial part of this technique can be delegated.  Either in my treatment plan or my "Next Time Notes," I will make an entry like "Two palatal TADs, 3rd rugae."  This let's my orthodontic technician know where to place the topical.  We also review all TAD insertions at morning huddle.

So after the technician seats the patient and obtains a blood pressure and pulse reading, they then evaluate the situation and confirm that the "Next Time" notes are correct and we will be placing a TAD or two today.  The technician explains the procedure to the patient and tries to assess the patient's anxiety level.

The technician dries the palatal mucosa with gauze and uses a Q-tip to place the Profound* gel over the area of the 3rd rugae.  It is covered with several layers of gauze which the patient is instructed to hold in place for 5 minutes.  It is then rinsed off and the technician will signal me that we are good to go to do the local anesthesia.  Typically, the time between initial application of the Profound gel and the actual insertion of local is 8 minutes so usually the tissue is pretty numb at that point.

I'll then explain again to the patient what to expect (more next time) and mark the tissue area with an intra-oral marker.

I will then insert the needle into that area.  I usually bend the needle 45 degrees if I the insertion site is left of the midline and 90 degrees if right of the midline.  The tissue is thin in this area so go slow to avoid impinging on the periosteum and causing pain.

I keep injecting very slowly until I've accomplished three clicks of the syringe.  That is a total amount of anesthesia of 0.18 ml or 10% of a 1.8 ml carpule.  You will notice a blanching of the tissues.  I'll then immediately check the level of anesthesia with a perio probe by making a hole in the tissue in each area.  I'll explain to the patient that what they just felt was me making two holes (one of each side) in their gums.  They are always amazed that they felt nothing.  You always can start inserting the screw immediately after finishing injecting.

I use a Rocky Mountain Orthonia electric torque driver to insert the TAD.  It is set at 30 RPM and 30 NCm of torque.  To the best of my knowledge, it will accept the contra angle driver from all TAD manufacturers.

I'll place it in the proper area and make sure the angle of the driver is correct and then place my finger on top of the head of the driver to create some downward pressure to help the screw penetrate the bone initially.  Then I'll remove my finger after the screw is about 50% in.  Repeat on the other side if appropriate.


Most TAD systems have impression caps that are placed over the TADs at this point prior to taking an impression (see below).


To capture the most precise impression possible, I combine alginate with impression compound (brown).  The impression compound gives a very rigid impression to help stabilize the impression caps without any float.


 You soften the end of a stick of brown impression compound until it slumps and then immerse in water.  Mold it with your gloved fingers into a thick wafer, reflame it to soften the tissue surface and blow some water on it to cool it.  Then place it in the mouth adapting it to the screws.  Spray it with air to harden it.  Take a routine alginate impression.  When you remove the impression tray, the compound and the impression caps will usually come out with the alginate.

Take it to the lab and insert analogs into the caps.  Pour in yellow stone.

If there is any doubt about the stability of the compound or the impression caps, I will stabilize them with cyanoacrylate.

Addendum:  Three days after I posted this, I did two palatal screws on a dental assistant from my dentist's office.  She was pretty anxious about the idea of palatal anesthesia.  After I was done, she stated that it was really nothing to it at all.  Certainly, no more uncomfortable than buccal infiltration.  She was really amazed.


*
http://www.woodlandhillspharmacy.com/profound_gel.html

Thursday, February 5, 2015

Palatal Anesthesia Is Not The Big Bad Wolf of TAD Placement!!!


I bet you that many orthodontic residents decided to pursue the specialty of orthodontics because they had hoped to avoid all those nasty dental things like local anesthesia.  Unfortunately for them, since the advent of TADs, local anesthesia is a necessary skill in the orthodontic armamentarium.  And now, to make matters worse, we have all the miniscrew gurus saying that the best location in which to place a TAD is to insert it into the anterior palate where the bone density is ideal for TAD retention.  Oh no!  Not only is this local anesthesia but it is in an area where most dentists fear to tread.  Kind of like a double whammy.

I was lucky when I went through the orthodontic program at Tufts.  I had the chance of working as a general dentist Tuesday and Thursday evenings and all day Saturdays.  This was in a private fee for service practice where virtually every patient was an adult already treatment planned for restorative and they all were treated with local anesthesia.  I became very comfortable with the concept so it was easy to transfer those skills to the use of miniscrews.

I think the first key to doing palatal anesthesia in a patient friendly manner is to use the smallest needle available which is not a 30 gauge as most think but a 33 gauge ultra short.  A 33 gauge needle is approximately 30% smaller in diameter than a 30 gauge.  That is a big difference.

The second key is to use a strong topical anesthetic.  Some people claim that a strong topical is enough to allow you to insert a miniscrew without even local anesthetic.  I am unwilling to be that brave, nonetheless, I figure, if that is true, I can use that kind of strong topical to prior to local anesthetic.


The third key is to realize that because of the extremely small diameter of the 33 gauge needle, there will be a fair amount of back pressure so instead of using a standard syringe, you will need to use a intraligamentary syringe.  These typically have a lever arm and not a plunger.  Also,  the syringe looks more like a pen and I think that helps relax the patient.
I like the one from Septodont called a Paroject syringe.  It has a lever arm to dispense the solution.  It takes 30 activations of the lever arm to empty a 1.8 ml syringe and only 2 or 3 activations for adequate anesthesia to insert a palatal miniscrew.

Next time: Technique

Thursday, December 4, 2014

One Easy Way to Reduce Treatment Time and Broken Braces


In a previous posting, I talked about controlling vertical growth problems by placing composite resin or glass ionomer cement on the occlusal surface of terminal molars.  You can also place composite on the lingual of upper anterior teeth.  How do you decide which to do? If you want to intrude molars (think open bite), use posterior turbos.  If you want to extrude molars (think deep bite) use anterior turbos.


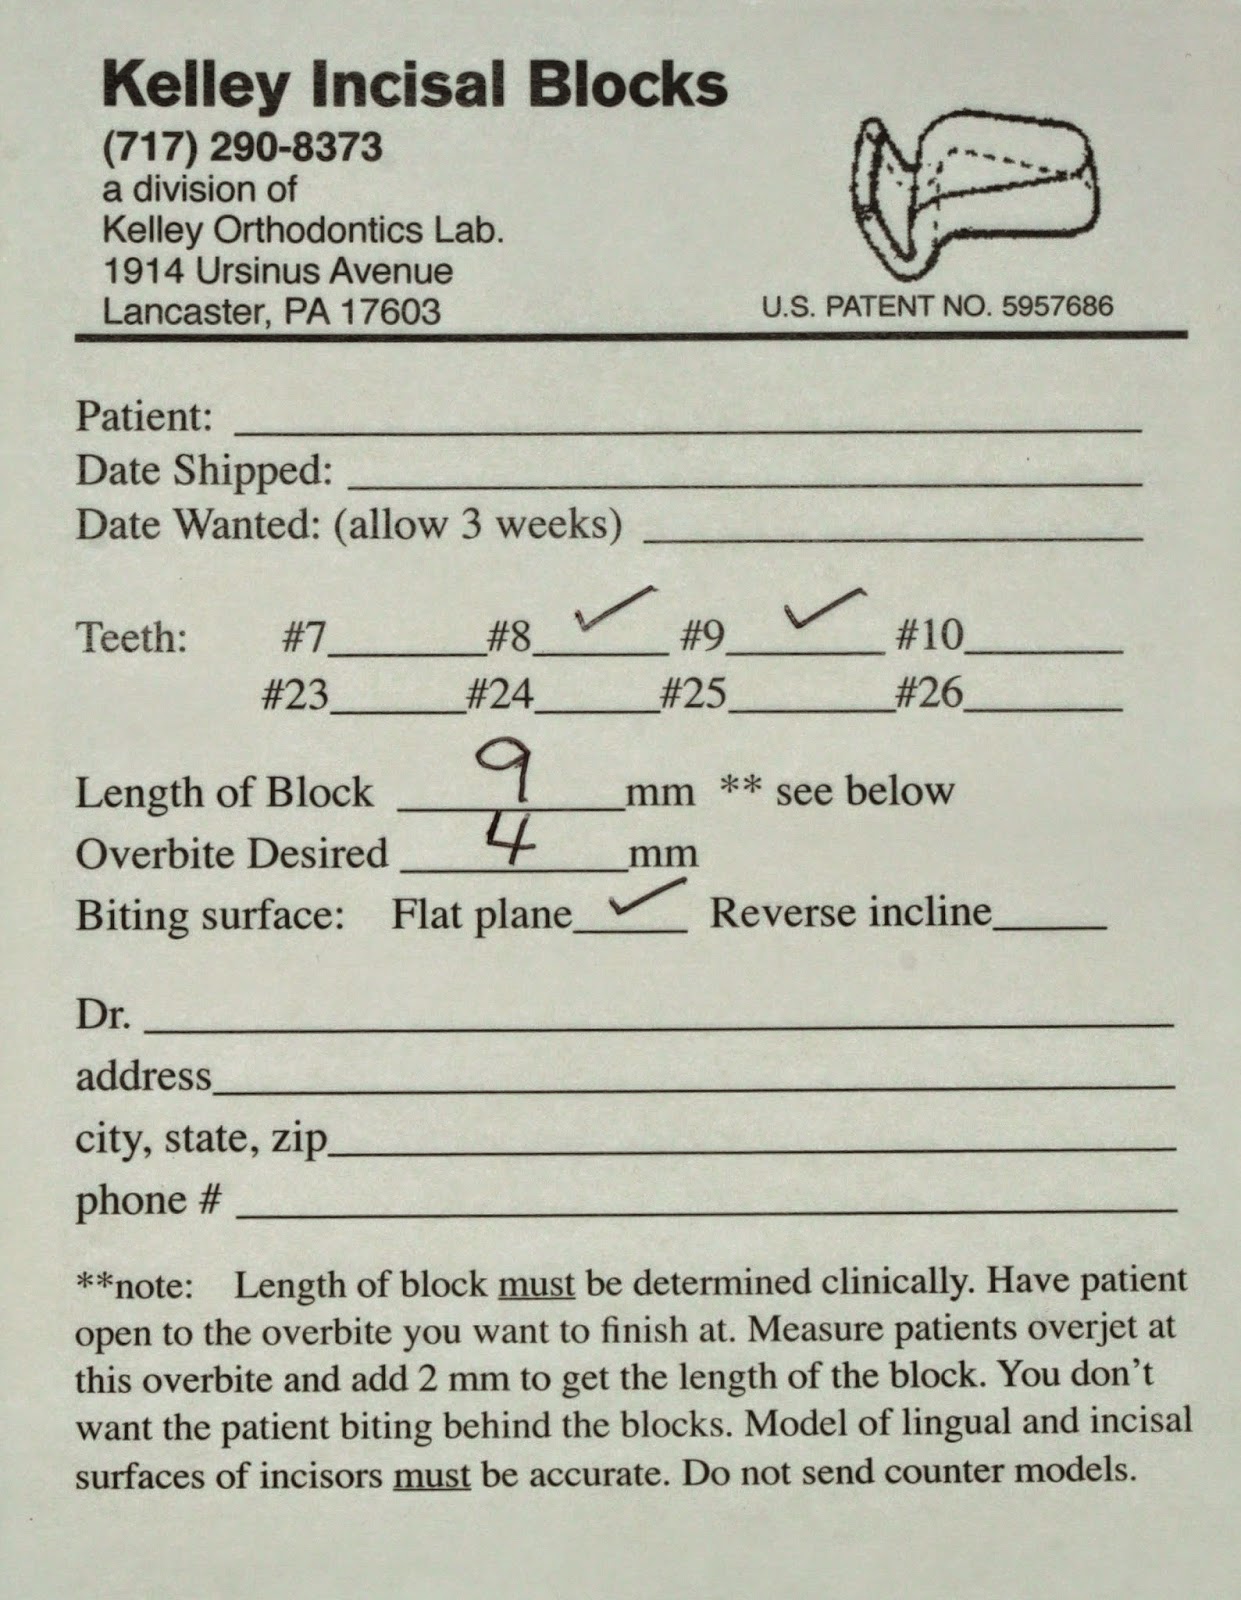
The best way to do anterior turbos to extrude molars is with custom turbos from Kelley Incisal Blocks Laboratory.  You merely obtain an anterior alginate impression and, on the lab sheet, you specify how much overbite you want to finish with.  I usually ask for 4 mm.  You also have to specify the length of the block.  This means how much overjet there is between the incisors when there is 4 mm of overbite.  This must be determined clinically but I usually just ask for 9 mm and cut away what I don’t need.  Almost always they are placed on the central incisors but can be placed on the lateral incisors if appropriate.


To bond these into place, you merely micro etch or pumice the lingual of the upper central incisors and then either traditional etch for 30 seconds or use a L-pop for 5 seconds.  Place  a generous amount of flowable composite on the custom turbo surface that faces the tooth.  No bonding resin required.*  Then place the custom turbo on the tooth.  The cap insures that it is at the proper height.  Do not etch the incisal 1 mm of the tooth so that the cap will be easy to remove.

*No sealant makes it easier to remove the cap at the end of this phase of treatment.  If you are dealing with a deep bite particularly in a teenage male carnivore, use Assure or something similar to enhance bond strength.


Light cure for 30 seconds.  Then use a #8 round bur in a slow speed to remove the cap and to smooth out the lingual anatomy as necessary.  You can advise light chewing for the next 24 hours but these things are pretty rugged and they rarely come off.  Depending on your state laws, all of the above can be delegated.  Finally, mark with blue paper and decide whether you need to full 9 mm or you can remove the excess with a straight diamond in a high speed.


In the photo below right, you can see I cut back on the length of the block.  I usually leave the turbos in until I am in a full size lower working wire.  For me that is a 19x25 in a 22 slot.  So that usually means 6 months.  You only have to grab the sides of the turbo with a How plier and squeeze once or twice to remove it.  Typically this fractures the cement and the turbo comes off.

Some people like to put these on during space closure if extractions were done or even in a deep bite non extraction case.  By opening the bite, you facilitate tooth movement.
                                                                           
Please make any comments or ask any questions below.


Thursday, November 13, 2014

Modifying a Nance Button To Use As a Bite Plane


While I use turbos of all sizes and locations, sometimes using a bite plate is the way to go.  Unfortunately, patients don’t seem to like removable bite plates as much as orthodontists like them.  So following the lead of my restorative colleagues (“I do fixed everything if possible, nothing removable”), I started doing fixed bite plates quite some time ago.

You start with a Nance button (see my post of October 11, 2014) and then extend the acrylic up on the lingual of the central and lateral incisors. (see the first image)

After curing the acrylic and removing the Nance from the model, you will notice that the underside of the acrylic that touches the central and lateral incisors has the images of those teeth.  You need to polish the images of those teeth away.  (see the 2nd and 3rd images)  If the acrylic does not actually touch the lingual of the upper incisors, you have nothing to worry about as far as decals go.  Please note that I did not trim the acrylic on the lingual of the laterals since I had planned to grind away that entire area.

Please make any comments or ask any questions below.

In my next post, I will discuss several different approaches to posterior and anterior turbos.